
Tempering chocolate: Why and how do we do it?
If you're a pastry-making enthusiast, the chances are you've heard of tempering. If you use Valrhona chocolate, you might have already noticed the temperature diagrams on the back of your bags of beans. Today, we're going to tell you all about this very important technical stage in the chocolate-making process. And we're doing it with Mehdi, founder of The French Pâtissier, a French training organization for pastry enthusiasts. So what have we got in store for you? Get ready to learn some serious pastry-making techniques - but still have fun while you’re doing it! Read on to find out more about tempering chocolate!
Why do we have to temper chocolate?
Why is tempering chocolate so important?
Tempering enables chocolate to keep its organoleptic characteristics and qualities to the greatest possible degree. But what does that mean in practice? We’re talking about chocolate with a brilliant shine and a texture that snaps, which melts in the mouth but not on your hands, and which bursts with different flavors.
If you don’t temper your chocolate, it will have:
- A dull look
- A grainy texture
- A whitish bloom
- And it will melt when handled.
So by tempering your chocolate, you can be sure it will be glossy, smooth, easy to snap in two and won't melt when handled.
When should chocolate be tempered? And for which recipes and uses?
Tempering is essential when you want to make something that’s 100% chocolate, like chocolate decorations, Easter or Christmas molded chocolates, bars, bonbons, or even decorations for desserts. On the other hand, if you are mixing chocolate with another ingredient, you don’t have to do it, so there's no need to temper if you're making ganaches, crémeux or glazes.
Tempering chocolate: before you start
What's the difference between melting and tempering chocolate?
This is an important distinction. Melting chocolate simply means bringing it to its liquid state. Tempering involves melting it, then controlling how its temperature falls back down.
When chocolate is tempered, it goes through three temperatures:
- A melting temperature
- A pre-crystallization temperature
- A working temperature
Once the working temperature has been reached, the chocolate can start to crystallize or set, giving it excellent organoleptic qualities.
Is the technique the same for Valrhona dark, milk, Dulcey Blond, white and Inspiration chocolate?
The technique is the same, but the three temperatures vary. Not all chocolates have the same composition. Temperature diagrams vary depending on the cocoa butter and dry matter content.
What is a tempering diagram? Tempering diagrams show you the three temperatures you need to stick to when tempering your chocolate. You'll find them on the back of your packs of Valrhona chocolate. They are specific to each product and an essential tempering tool.
Why use couverture chocolate? Couverture chocolate is rich in cocoa butter, which makes it easier to work with and more fluid. To qualify as couverture chocolate, a product must contain at least 31% cocoa butter.
What equipment do you need?
- A thermometer It’s not possible to temper without one! According to Mehdi, a laser thermometer is the best option, as there are several drawbacks to a probe thermometer. First, the results won’t be accurate if the metal probe is cold. Second, if you keep measuring the temperature and pulling out the probe, the chocolate may set around it, falsifying the result. And last but not least, probe thermometers also make your work surface a bit messier.
- A spatula - vital for mixing chocolate thoroughly and giving it an even temperature.
- A large mixing bowl or other container
- A hairdryer or heat gun
- A double boiler or microwave
- If you're making molded chocolates or bars: immaculately clean molds. We recommend cleaning your molds with household vinegar, as this will stop your chocolate getting any marks.
- Patience and resilience: Your first attempt at tempering might not go as planned!
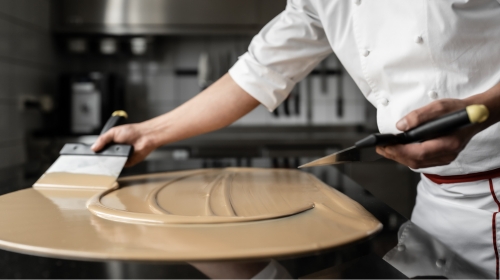
How to temper chocolate
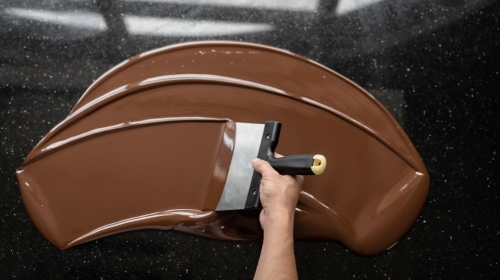
The professional method: tabling. You might have seen chefs working with large quantities of melted chocolate on a marble worktop. The chances are you don’t have an equivalent space to work on. What's more, you run the risk of coating your kitchen floor to ceiling with chocolate, which we don't want you to do!
The seeding method. This is the method we recommend for making chocolates at home. It involves melting a certain amount of Valrhona fèves, then adding in some solid fèves. This makes the chocolate fall back to its pre-crystallization temperature much quicker.
Chocolate tempering: an A-to-Z guide for pastry enthusiasts
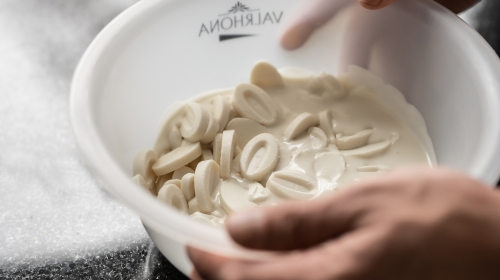
Step 1: Start, for example, with 400g of chocolate fèves. Set aside 100g.
Note: You must use at least 300g for the seeding method. You need a certain amount so that the chocolate has a bit of heat resistance, otherwise, the temperature changes too quickly.
Step 2: Melt the 300g of chocolate in a double boiler or microwave. If you’re using a microwave, melt it gradually, checking every 10 seconds. Most importantly, don't add water. If you’re using a double boiler, watch out for steam. If it's cold in your kitchen, it can condense and fall back into your mixing bowl, which would ruin the tempering process.
Remember that each chocolate has a different melting temperature:
- Dark chocolate: 120/130°F (50/55°C)
- Milk chocolate: 100/120°F (45/50°C)
- White and Dulcey chocolate: 100/120°F (45/50°C)
- Inspiration: 105/115°F (40/45°C)
Step 3: It’s time to use the fèves you set aside at the beginning. The aim here is to lower the temperature by adding solid chocolate. If you add whole fèves, the whole thing may cool too quickly. Mehdi's advice? Chop them into tiny pieces. Be sure to use a sharp knife, because if you create too much friction with a blunt knife, this will start to warm the beans. Another option is to grind your 100g into a powder by processing it in the blender for a few seconds.
Step 4: Gradually add your chopped beans to the melted chocolate, stirring all the while and checking the temperature. Go slowly - one tablespoon at a time is enough.
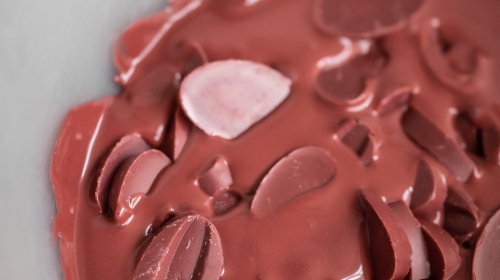
Step 5: Keep going until the chocolate has reached its pre-crystallization temperature. It should be liquid but starting to thicken. This means it has started to crystallize.
Again, its temperature will vary depending on the chocolate you are working with.
- Dark: 82/84°F (28/29°C)
- Milk: 81/82°F (27/28°C)
- White and Dulcey: 79/81°F (26/27°C)
- Inspiration: 81/82°F (27/28°C)
At this stage, all the chocolate should be melted and there shouldn’t be any pieces left.
Step 6: Now you’re going to warm your chocolate one last time. It needs to rise by 2 degrees to reach working temperature. This working temperature also depends on the type of chocolate you’re using:
- Dark: 88/90°F (31/32°C)
- Milk: 84/86°F (29/30°C)
- White and Dulcey blond: 82/84°F (28/29°C)
- Inspiration: 86/88°F (30/31°C)
Be careful if you want to use a double boiler with a stainless steel bowl, as it will have an insulating effect and retain heat even when it’s removed from the water. Mehdi recommends you use a hair dryer or heat gun for this step instead. Hold the heating implement not too close to the bowl and stir thoroughly so the temperature is even.
Step 7: Has your chocolate reached working temperature? Great! Now you can start making your decorations or molding your bars or eggs. It’s vital this temperature stays steady at all times. According to Mehdi, this is the trickiest part.
Leave your creations at room temperature to crystallize them. You don't need to cover them. You can also place them in the refrigerator for up to 10 minutes, if you're making a thin layer of molded chocolate. However, don’t forget that your refrigerator mustn’t have any smells or moisture.
If you're making a multi-layered molded chocolate, allow the first layer to pre-crystallize (rather than set completely) before adding the second. Wait until the chocolate is a little dull, then apply the second layer.
How do I know if I’ve tempered my chocolate properly?
Before you start making your decorations or molded chocolates, you can do the following test. Cut out a strip of parchment paper. Place it on the chocolate’s surface while it’s at working temperature. Put the strip on a wooden or plastic board with the chocolate facing up. If it doesn't crystallize after three minutes or it solidifies with white streaks, the tempering process hasn’t worked and you need to start again.
A variant on this test is to make a first strip of chocolate at around 105°F (40°C), then another at working temperature. The second should crystallize faster than the first if the tempering has worked.
Another moment of truth comes when it's time to take the chocolate out of its mold. Well-tempered chocolate is easy to turn out and has no white streaks.
Mistakes to avoid
- Adding water: If you've added any, don't throw your chocolate away! It can’t be tempered anymore, but you can still use it for a ganache or another preparation.
- Thinking you can afford not to be precise: The various temperatures need to be followed, as a difference of just a few degrees has a major impact on the result.
- Wanting to work too fast: Be patient!
- Wanting to go straight to working temperature
- Not taking into account the double boiler’s ability to stay at the same temperature when you are heating the chocolate
- Starting with too small a quantity: Start with at least 300g. The chocolate needs to be able to resist the heat a little bit, otherwise the temperature changes too quickly and it’s impossible to control it. Don't be afraid of using too much chocolate, as it can always be tempered again.
- Making an overly thin layer in a mold: This makes your chocolate more likely to break. It’s important to make several layers. Wait until the first coat begins to dull, then add the second.
- Overheating (above the melting temperature): This will burn the chocolate and the sugar it contains will turn to caramel. White and blond chocolates contain powdered milk, which burns very quickly. Once a chocolate has been burnt, unfortunately it can’t be rescued.
A few extra tips from The French Pâtissier
- Practice! It’s no secret that regular practice is the best thing you can do. What's more, you can re-temper chocolate several times in a row. So don't worry, you're not wasting anything (unless you've really overheated it - or you’ve eaten it all!).
- Don't be discouraged. The most important quality a passionate pastry chef can have is resilience. It’s humbling to remember that professional pastry chefs take years to acquire their skills.
- Don't put pressure on yourself because of things you see on social media. People only post their successes, not the (many) failed attempts.
Deepening your knowledge: all about crystals
When chocolate is tempered effectively, its cocoa butter crystals are arranged evenly. For you to be able to use it in a form other than beans, it has to go through a liquid state. However, the crystals lose their organized structure when they melt. If the chocolate is cooled as it is, it will be brittle, as its structure isn’t right. Tempering rearranges the crystals so they take on an organized, regular structure again.
To be even more specific, it's the chocolate's beta crystals that give it the shine and snappy texture you want. When the lowest temperature on the diagram is reached, the chocolate isn’t hard, but it is starting to develop a few beta crystals. Crystallization progresses quicker once the beta crystals begin to appear, just like it does when frost develops on the ground.